
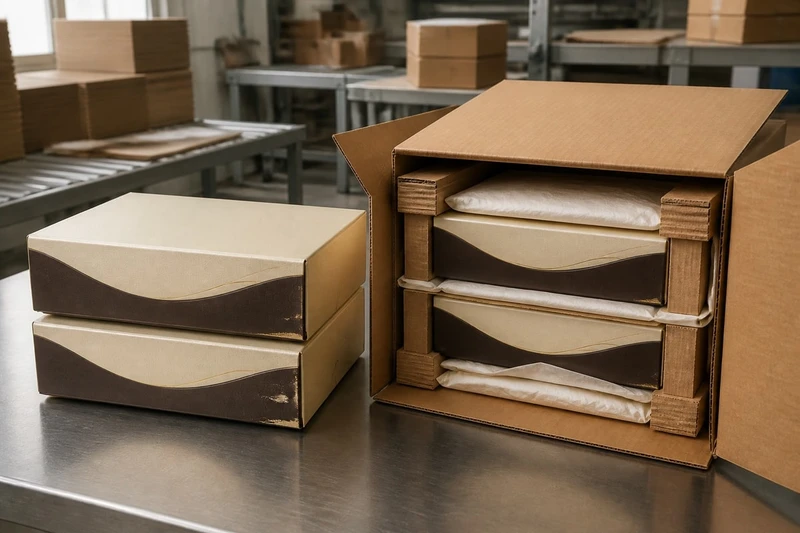
Finished packaging is most likely to scuff or crush when protection is considered as a single material choice rather than a complete system. A robust carton cannot fully protect a gloss-coated gift box if finished faces rub together, and tissue paper will not prevent corner damage if outer cartons are overfilled or poorly stacked.
To prevent packaging scuffing and crushing, match the surface finish, box structure, internal separation, shipper carton and pallet arrangement to the real storage and delivery route. The best approach is to identify where damage occurs, then test the finished pack-out under realistic handling conditions before committing to volume production.
Identify likely damage mechanisms
Scuffs and crushing are different failures, although they often happen in the same consignment. Scuffing is surface abrasion: printed ink, foil, varnish or lamination becomes marked through friction. Crushing is structural deformation: panels bow, corners flatten, lids dent or inserts collapse under pressure or impact.
Before changing a board grade or adding packing material, inspect damaged packs and establish the likely mechanism.
Common causes of scuffing
Scuffing usually occurs when printed surfaces move against another surface. This may happen:
- When individual boxes are packed face-to-face without a separator.
- During vibration in a delivery vehicle, especially where cartons have empty space.
- When stacks of finished packs are dragged rather than lifted.
- When gloss, uncoated or dark-coloured surfaces contact rough corrugated board.
- When labels, tape edges, staples or exposed internal fittings rub against the product pack.
- When packaging is packed before inks, coatings or adhesive areas have properly settled.
A scuff pattern can offer useful clues. Broad dull patches often point to repeated rubbing in transit. Linear scratches may indicate a sharp carton edge, divider, label or foreign object. Marks concentrated on one panel can show that packs are shifting in a particular direction.
Common causes of crushing
Crushing generally comes from compression, impact or insufficient support. Typical contributors include:
- A shipper carton that is too large, leaving packs free to move.
- An outer carton that lacks enough strength for the stack height and storage period.
- Heavy products positioned above lightweight or hollow presentation boxes.
- Empty voids within the carton, allowing items to gain momentum before impact.
- Unsupported lids, large panels or long narrow box walls.
- Pallets stacked unevenly, with cartons overhanging the edge.
- Moisture exposure that weakens paper-based materials during warehousing or transport.
- Handlers gripping cartons at weak panel areas or stacking them in the wrong orientation.
In South African supply chains, packaging may pass through several handovers and variable storage conditions before it reaches a retailer or consumer. The aim is not to assume every carton will be handled gently. It is to design a pack-out that remains stable when it is lifted, stacked, moved and held in storage.
Start with a damage map
A simple damage map helps procurement and product teams avoid treating symptoms only. Record:
- The affected pack type: for example, folding carton, rigid gift box, sleeve, mailer or label roll.
- The damaged area: corners, lid edges, front panel, foil detail, window or base.
- The stage where it is first found: after packing, at warehouse receiving, after distribution or at retail.
- The damage type: abrasion, denting, panel collapse, edge whitening, tearing or moisture distortion.
- The pack configuration: quantity per carton, divider type, orientation and pallet position.
This information makes it easier to decide whether the priority is a more resistant finish, a stronger structure, improved separation or a more controlled outer-carton arrangement.
Review coating and finish sensitivity
The desired visual effect and the required handling resistance are closely linked. A finish should be selected for the actual journey, not only for how it looks when first opened at a presentation meeting.
No coating makes a box immune to damage. However, some finishes offer a more forgiving surface, while others need better separation and cleaner packing conditions.
| Finish or surface | Typical scuff sensitivity | Practical protection approach | Points to confirm |
|---|---|---|---|
| Uncoated printed board | Moderate to high | Use clean separators and avoid direct face contact | Ink coverage, rubbing risk and handling frequency |
| Gloss lamination | Moderate | Prevent sliding between packs; use smooth liners | Visibility of scratches and adhesion at folds |
| Matt lamination | Often high | Separate every presentation face where possible | Dark colours can show rub marks readily |
| Soft-touch lamination | High | Use low-friction protective sheets and tight, stable pack-out | Marks, fingerprints and compatibility with tapes or labels |
| Aqueous or protective varnish | Varies | Match the coating to expected abrasion and pack-out | Coverage, cure time and finish level |
| Foil, embossing or debossing | Localised risk | Protect raised, recessed and metallic details from pressure and rubbing | Placement, relief depth and contact points |
| Dark solid colour printing | High visibility | Use a more protective finish and strict separation | Whether minor surface marks are acceptable |
A matt or soft-touch finish may be a strong choice for premium packaging, but it often demands greater care during packing and distribution than a more forgiving surface. Similarly, rich black, navy and other dark solid colours can reveal scuffs that might be less visible on a lighter or patterned design.
Check finish compatibility with the pack-out
Ask these practical questions before approving a finish:
- Will printed faces touch one another in the shipper carton?
- Does the selected tissue, foam, paper wrap or divider transfer texture, dust or colour?
- Will adhesive labels, tape or shrink film touch the presentation surface?
- Are there foil details or raised areas that become pressure points when boxes are stacked?
- Is the finish likely to be handled repeatedly by retail staff or customers before sale?
- Can the packs be fully dry and stable before they are nested, stacked or carton-packed?
The right answer is often not “use the toughest finish”. A more effective and economical solution may be to retain the desired finish while improving the separator, changing the packing orientation or reducing movement inside the carton.
Do not use finish samples in isolation
A flat printed sample can confirm colour and visual texture, but it cannot reliably show how a completed box will perform. Folds, edges, corners, glue areas, inserts and contact pressure all change the result.
Request finished, assembled samples in the proposed pack-out. Include the actual divider or interleaving material, rather than testing the box on its own. This is particularly important for premium presentation packs, including custom gift packaging, where surface appearance is a core part of the product experience.
Strengthen corners, panels and inserts
Crushing resistance starts with the product pack’s structure. Board thickness matters, but it is only one variable. Shape, fold placement, panel span, load paths and internal support all affect how a box handles compression.
Reinforce the parts that carry load
Corners usually carry stacking loads better than wide, unsupported panels. Structures that direct pressure through corners and firm sidewalls generally resist deformation more effectively than large flat faces with little internal support.
Useful structural measures include:
- Choosing a box style with secure corner construction for the intended stack.
- Reducing overly wide unsupported panels where the design allows.
- Adding a fitted insert that supports the lid or sidewalls from within.
- Using shoulder-and-neck, tray-and-sleeve or similar constructions where extra rigidity is needed.
- Designing an insert that holds the product securely without putting pressure on decorated outer panels.
- Ensuring the base supports the product weight instead of relying on a lid or sleeve.
- Avoiding cut-outs that remove too much support from load-bearing panels.
For heavy, fragile or irregularly shaped products, the insert should perform two jobs: position the product and help distribute load. A decorative insert that looks neat but allows the item to shift does not provide sufficient transit protection.
Match the box to the product weight and geometry
A rigid box may be appropriate for a premium item, but even a rigid construction can deform if the contents are much heavier than expected or if the item concentrates force in one area. Conversely, a well-designed folding carton can work effectively for a lighter product when it is properly supported in an outer carton.
Confirm:
- Product mass, including accessories and leaflets.
- Whether the product has sharp, narrow or hard contact points.
- The amount of free movement allowed inside the retail pack.
- Whether the pack must support other packs during stacking.
- Whether a lid, sleeve or window will be placed under repeated compression.
- Whether the product can settle or shift after packing.
Avoid over-engineering the retail box
A thicker or more complex retail box is not always the best response to crushing. It can raise material use, alter the opening experience and still leave the true cause unresolved: a loose outer carton or an unsuitable pallet pattern.
Strengthen the presentation pack where it needs support, then make the transport carton responsible for transport-level protection. Separating these roles usually creates a more efficient result.
For products requiring a tailored structural approach, a supplier of custom packaging boxes can help compare styles, inserts and board options against the actual product and packing method.
Separate finished surfaces in the carton
If finished packs can rub, they eventually will. Separation is the principal control for cosmetic damage, especially with matt, soft-touch, foil-stamped and dark-coloured packaging.
The separator must be clean, consistent and compatible with the surface it protects. It should remain in place during vibration and not itself create dents, edge marks or transfer.
Separation options and where they work
Interleaving sheets are placed between stacked packs. Smooth paper, tissue or suitably selected protective sheets can reduce face-to-face abrasion. They are practical for flat boxes and sleeves, but very thin materials may bunch up or shift.
Corrugated or board dividers create individual cells or layers. They give stronger physical separation and can prevent packs from moving sideways. Ensure divider edges do not rub against delicate finished panels.
Folded paper wraps can protect individual pieces where a presentation face needs full coverage. They add labour and material, so they are often reserved for premium packs or highly sensitive finishes.
Trays and fitted inner cartons hold packs in a fixed orientation. They are useful where product boxes have vulnerable corners, lids or protruding features.
Protective bags or sleeves can be effective for high-value surfaces, but they should be assessed for static, moisture retention, application effort and their effect on the unboxing experience.
Design the separator around the contact points
Do not simply add material everywhere. Identify the surfaces that touch under normal stacking and movement. For example:
- A lid may need protection from the base of the pack above it.
- Foil branding on the front panel may require a full-face interleaf.
- Corners may need a cell divider rather than a flat sheet.
- A sleeve may need support that prevents it from sliding off or becoming oval.
- A window may need a recess or spacer so it is not pressed directly against another pack.
The ideal arrangement prevents movement without creating excessive compression. Tightness is not always protection: over-packed cartons can crush corners and imprint divider textures onto soft finishes.
Keep packing materials clean and dry
A separator cannot protect a surface if it carries grit, rough fibres, adhesive residue or moisture. Use packing materials that are suitable for the finish and store them away from dust, damp conditions and loose debris. Packing benches should also be kept clear of exposed blades, staples and tape ends.
A common mistake is choosing a protective layer based only on its softness. Surface texture, fibre shedding, dye transfer and pressure behaviour matter too. Always test the exact material against the finished packaging.
Control carton fill and pallet arrangement
A well-designed product box can still fail if its shipper carton is poorly filled or its pallet arrangement creates unstable loads. Outer-carton design should control movement, distribute weight and protect the retail pack from compression and impact.
Aim for stable fill, not maximum quantity
Cartons should be filled to minimise movement while allowing packs to sit without forced compression. The right quantity depends on product dimensions, pack strength, divider design and carton orientation.
Problems caused by too little fill include:
- Packs sliding and rubbing during transport.
- Products colliding with carton walls.
- Uneven loads that allow cartons to deform.
Problems caused by too much fill include:
- Crushed corners from forced insertion.
- Bulging carton panels that weaken stacking performance.
- Compression damage to lids, windows and protruding features.
- Difficulty closing and sealing cartons consistently.
Void fill can stabilise a shipment, but it should not substitute for a properly sized carton. Use it to prevent movement in unavoidable spaces, not to make an oversized carton acceptable.
Choose a sensible orientation
The strongest orientation is usually the one that lets load transfer through supported edges, bases and corners rather than broad display panels. Marking an orientation on the outer carton may help, but it should not be the sole protection measure; cartons may still be turned during handling.
When deciding orientation, consider:
- Which panel carries product weight.
- Which face has the most sensitive finish or decorative feature.
- Whether the box has a lid that could be pressed down.
- Whether inserts support the product when the carton is on its side.
- How cartons will be loaded on a pallet and removed at destination.
Build pallet loads with edge support
Pallet arrangement influences both carton compression and the risk of impact. Keep cartons within the pallet footprint where possible. Overhanging cartons are exposed to knocks and receive less support under their edges.
A stable pallet load generally has:
- Heavier cartons at the bottom.
- Even weight distribution across the pallet.
- Aligned layers that avoid unstable gaps.
- Cartons placed with their stronger orientation facing the expected load.
- Appropriate wrapping or restraint to limit movement without crushing cartons.
- Protection from water and prolonged damp storage where relevant.
Do not use stretch wrap so tightly that it crushes lightweight cartons, particularly those containing premium boxes with unsupported lids or decorative features. Conversely, wrapping that is too loose can allow cartons to move and rub.
Account for storage time and conditions
Compression damage can appear gradually. A carton that looks satisfactory immediately after packing may soften or deform after time under load, particularly where humidity, uneven stacking or extended warehousing are factors.
Consider the full journey:
- Finished boxes waiting before carton packing.
- Cartons held in a warehouse.
- Palletised storage.
- Loading and vehicle movement.
- Receiving, unpacking and retail replenishment.
- Possible returns or onward distribution.
If the route includes repeat handling or long storage, test for those conditions rather than only for the first dispatch.
Trial the real pack-out and handling route
The most reliable way to prevent packaging scuffing and crushing is to trial the complete system. Testing only the retail box, only the printed finish or only the shipper carton can leave a weak link undiscovered.
A practical trial should use production-representative materials and the intended packing method.
What to include in a pack-out trial
Use:
- Completed boxes with the final print finish and embellishments.
- The real product, or a representative item with equivalent weight and shape.
- Final inserts, dividers, wraps and void-fill materials.
- The proposed outer carton and sealing method.
- The intended quantity per carton.
- The planned pallet pattern and load restraint method where applicable.
Then subject the packs to the kinds of events they are likely to encounter: lifting, placing, controlled stacking, movement over distance, short periods under load and unpacking. Inspect after each stage rather than only at the end.
Inspect more than the obvious damage
Review:
- Surface scuffs visible under ordinary lighting.
- Fine scratching on gloss, matt and foil areas.
- Dented lids, flattened corners and bowed panels.
- Insert displacement or product movement.
- Marks caused by divider edges or void fill.
- Carton bulging, seam strain and weak closure points.
- Damage that occurs only to cartons on pallet edges or lower layers.
- How easily the packing team can repeat the method correctly.
The final point is important. A complex pack-out that works once but is difficult to repeat consistently can create variable results in routine operations. Choose a method that is clear, practical and easy to check.
Change one variable at a time
When damage appears, avoid changing the finish, box board, divider and shipper carton all at once. You may solve the problem, but you will not know which change mattered or whether the added cost was necessary.
A sensible sequence is:
- Eliminate direct contact between vulnerable surfaces.
- Reduce movement within the outer carton.
- Correct carton size, orientation and fill level.
- Improve internal support and corner protection.
- Review finish selection if abrasion remains.
- Re-test the complete pack-out.
This order often resolves cosmetic damage before more substantial structural changes are needed.
Common mistakes that lead to transit damage
Several decisions repeatedly increase the risk of damaged finished packaging:
- Selecting a premium surface finish without specifying protective separation.
- Using the same shipper carton quantity for boxes with different structures or product weights.
- Treating tissue as sufficient protection for sharp corners or heavy packs.
- Filling cartons until they bulge to reduce freight space.
- Leaving significant empty space and relying on loose void fill.
- Allowing product boxes to rest directly against rough carton walls.
- Ignoring how a carton is oriented on the pallet.
- Approving samples before testing the full packing configuration.
- Assuming “fragile” or orientation markings will replace physical protection.
- Changing material specifications without documenting the revised pack-out method.
FAQ
Is lamination enough to stop packaging scuffs?
No. Lamination can improve surface resistance, but it does not prevent repeated rubbing, sharp-edge scratches or compression marks. Finished surfaces still need separation and a stable outer-carton arrangement.
What is the best material to separate printed boxes?
There is no universal choice. Smooth interleaving sheets may suit flat packs, while cell dividers or trays are better for boxes with vulnerable corners. Test the chosen material against the exact finish to check for abrasion, texture transfer and movement.
Should the retail box or outer carton provide most of the crush protection?
Both have roles. The retail box should protect the product and retain its form, while the outer carton should manage transport compression, impacts and handling. Relying on only one layer usually increases cost or leaves a gap in protection.
How can I tell whether a carton is overfilled?
Warning signs include bulging sides, forced closures, packs that need pressure to fit, crushed corners straight after packing and inconsistent carton dimensions. A correctly filled carton should close securely without forcing the product packs together.
Preventing transit damage is a system-design task: protect sensitive finishes from contact, support vulnerable structures, control carton movement and validate the full route. Before placing a larger order, document the proposed pack-out and trial it with finished samples, the intended shipper carton and the actual product weight.
