
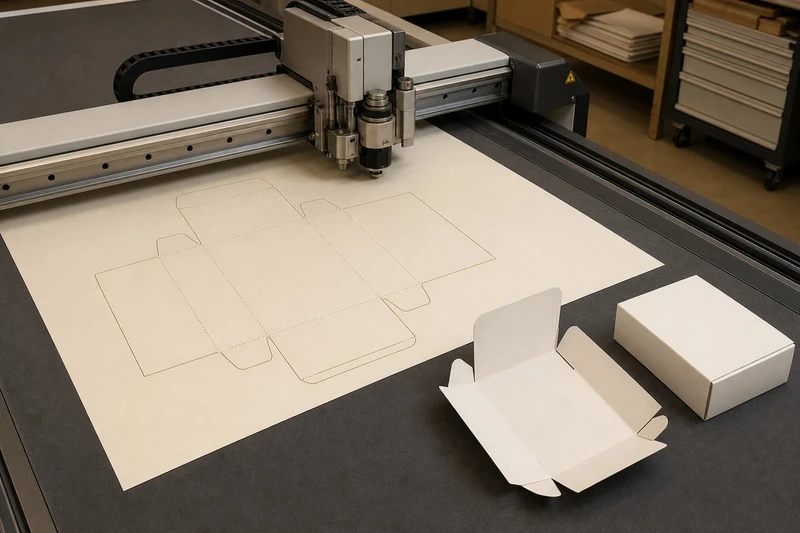
Packaging dielines are the technical templates used to turn flat artwork into a finished box, sleeve, label or carton. They show where packaging will be cut, folded, glued and, where applicable, opened or fitted with a window.
For brand and artwork teams, the main rule is simple: build artwork on the printer’s supplied dieline, keep essential content inside the safe area, extend backgrounds through the bleed, and never alter the structural lines without approval. A well-prepared dieline reduces avoidable delays, rework and the risk of receiving packaging that is correctly printed but poorly aligned or difficult to assemble.
Understand cut, crease and fold lines
A dieline is usually supplied as a vector PDF, Adobe Illustrator file or similar editable artwork template. It contains technical paths on separate layers or in named spot colours. These paths guide cutting, creasing and finishing; they are not intended to print on the finished packaging.
Although naming conventions vary between suppliers, the following elements are common.
| Dieline element | What it does | Artwork implication |
|---|---|---|
| Cut line | Defines the outer shape of the finished piece | Background artwork should extend beyond it into the bleed |
| Crease or score line | Creates a controlled fold in board or paper | Do not place small type, fine borders or critical graphics across it |
| Fold line | Indicates where a panel folds during assembly | Check that images and text remain correctly oriented once folded |
| Perforation line | Creates a tear-open or detachable section | Keep key copy and codes clear of the perforation |
| Glue flap or glue zone | Marks the area used to join the pack | Do not place essential artwork here unless agreed with the printer |
| Window cut-out | Removes material to reveal the product or insert | Treat the opening as a cut area, not as a printed transparent panel |
| Emboss, deboss or foil line | Defines a separate finishing effect | Use a clearly named, dedicated spot-colour layer |
Why cut and crease lines need separate handling
A cut line removes material. A crease line compresses the board so it folds in the intended place. They may look similar in an artwork file, but they have very different physical effects.
Artwork that is visually precise on screen can become awkward at a fold. For example:
- A thin rule placed exactly on a crease can appear broken, doubled or uneven after folding.
- Small lettering close to a cut edge can look cramped or be partially trimmed.
- A face, logo or product image running across a panel edge may shift slightly at the fold.
- Dark, solid ink areas near a crease can show scuffing or stress depending on the substrate and finish.
Treat structural lines as manufacturing instructions rather than design decoration. Lock the dieline layer once it has been placed correctly, and keep it switched on until final preflight.
Do not redraw or scale the supplied dieline
Redrawing a dieline can introduce small inaccuracies that become significant in production. Scaling a template, even proportionally, may change panel dimensions, glue allowances, crease positions and finishing registration.
If the pack size, board grade, product fit, closure or opening style changes, request a revised dieline. This is especially important for custom cartons, rigid gift boxes, mailer boxes and packaging with inserts. A structural change is not simply an artwork change.
Map panels and orientation
Before designing, identify which part of the flat layout becomes the front, back, sides, base, top and closure. A dieline can look unintuitive because panels are arranged flat for efficient printing and conversion, not in the order a shopper sees them.
Create a simple panel map for everyone involved in approval. It should show the assembled pack and label each visible panel.
Start with the assembled view
Ask these practical questions while reviewing the template:
- Which panel faces forward on shelf or in an online product image?
- Where will the product name, variant, size and main visual sit?
- Which panel carries ingredients, instructions, warnings, contact details or recycling information?
- Which sections are hidden by a flap, glued seam or closure?
- Which way will the packaging be opened, displayed and stocked?
- If there is a hanging tab, what will be visible when the product is suspended?
- Does the pack need to read correctly from more than one shelf-facing direction?
A three-dimensional mock-up is useful, but it does not replace checking the flat dieline. Use both. The mock-up helps the team understand orientation; the flat file is the production reference.
Keep hierarchy appropriate to each panel
The front panel typically carries the strongest brand and product message. Side panels suit supporting benefits, variant identifiers or repeat branding. The back panel often accommodates more detailed mandatory or operational information.
However, the available panel space is not always equal. Narrow side panels and dust flaps may be technically printable but unsuitable for dense copy. A carton may also lose visible area once it is packed, stacked or placed in a retail display.
For small packaging, reduce the message before reducing the type size. If the information cannot be read at normal handling distance, the design is unlikely to serve the customer or retail team well.
Check reading direction on every panel
Text can be set upright on one panel and sideways or upside down on another when the flat layout is viewed on screen. This is not necessarily an error, but it must be intentional.
Check orientation for:
- Product names and variant names
- Nutrition or ingredient panels where relevant
- Instructions and warnings
- Barcodes and QR codes
- Batch, date or variable-data spaces
- Directional arrows and opening instructions
- Repeating patterns with recognisable motifs
A physical white sample, when available, is especially useful for complex folding cartons and gift packaging. It allows the team to hold, open and inspect the shape before committing to final artwork.
Set bleed and safe areas
Bleed and safe areas protect artwork from normal production tolerances. They are not optional empty margins; they are part of a file that can be trimmed and converted reliably.
Bleed is extra artwork extending beyond the final cut line. It prevents thin, unprinted slivers from appearing at an edge if cutting varies slightly.
Safe area is the inward margin where important text, logos, lines and images should remain. It reduces the chance of critical elements being too close to a trim, fold or crease.
Use the printer’s specification first
Bleed and safe-area requirements vary with pack format, substrate, print process and finishing method. The dieline or job specification should take priority over generic design settings.
Where no job-specific instruction has been supplied, many packaging files use roughly 3 mm of bleed as a working starting point. This is not a universal rule. Some label formats, unusually small items, larger-format packaging and specialist finishing processes may need a different allowance. Confirm the required value before approval.
Extend all edge-to-edge elements into the bleed, including:
- Solid colour backgrounds
- Photographs
- Illustrations
- Patterns
- Textures
- Varnish or coating areas where specified
Do not simply stretch a photograph carelessly into the bleed if it introduces a visible edge or distortion. Extend or rebuild the background naturally.
Protect the safe area around more than cut edges
The safe area should also account for creases, perforations, glue flaps, windows and closures. A logo may technically fall inside the cut line yet still be too close to a fold to look balanced after assembly.
As a practical guide:
- Keep small text and fine linework comfortably inside the safe area.
- Avoid borders that run close and parallel to the outer trim edge; minor variation makes them look uneven.
- Leave extra clearance around opening tabs and thumb notches.
- Do not position a critical message beneath a closure flap.
- Avoid placing a key facial feature, logo detail or product claim across a fold.
Use editable vector artwork for logos and text
Vector files retain sharp edges when scaled and are normally preferred for logos, type and line art. Images should be placed at an effective resolution suitable for their final printed size, rather than judged by a large on-screen preview.
Check that:
- Fonts are outlined or supplied according to the printer’s file requirements.
- Images are linked or embedded correctly.
- The document uses the agreed colour mode and colour profile.
- Black text and fine black rules use the agreed black build.
- Overprint settings have been checked, particularly for black text and spot colours.
A PDF may look correct in a browser preview while containing missing links, unintended transparency behaviour or unsuitable colour settings. Use a production-ready PDF export preset only after confirming the printer’s requirements.
Handle windows, glue zones and finishes
Windows, glue zones and decorative finishes add impact, but they demand clearer artwork separation than standard print. Each operation should be visible in the production file and described consistently.
Windows and cut-outs
A window is usually a cut-out in the board, sometimes backed by a clear film. The visible product area depends on the structural design, adhesive placement and how the product sits inside.
When designing around a window:
- Keep text and logos clear of the opening edge.
- Do not assume the product will sit perfectly centred behind the window.
- Consider what the customer sees if the pack is empty, shifted or viewed from an angle.
- Confirm whether a clear film is included and whether it has its own constraints.
- Ensure the artwork does not imply transparency where there is only a printed visual effect.
If a window must frame a particular part of the product, the packaging and product teams should check product placement together. The dieline alone cannot guarantee how loose contents will settle inside a carton.
Glue zones and seams
Glue is normally applied to flaps or seams that overlap after folding. Ink, coating and foil in these areas can affect adhesion, so treat the glue zone as a functional restriction.
Do not place key text in a glue area. Where the exterior seam is visible, use non-critical background artwork or a deliberate design feature. If artwork needs to print in or near the seam, confirm the permitted coverage and any coating restrictions with the packaging supplier.
This also applies to self-locking boxes, crash-lock bases and multi-panel gift packaging, where more than one structural area may influence the finished appearance.
Foil, embossing, spot UV and varnish
Finishes should be supplied as dedicated technical layers, usually using clearly named spot colours. For example, a file may include separate layers for:
FOILEMBOSSDEBOSSSPOT UVVARNISHWHITE INKCUTCREASE
The exact names and colours should follow the job specification. A bright colour on screen does not mean that colour will print; it may simply identify a finishing mask.
Avoid very fine details, tiny reversed text and intricate patterns in finishes until their practical limits have been confirmed. Foil and raised effects can make packaging feel premium, but they may not reproduce delicate artwork as cleanly as standard ink.
For a practical example, a custom carton with foil branding may need the foil logo set back from folds and cut edges, while a promotional seal can be produced separately as a custom printed sticker if the campaign message may change between runs.
Check barcodes and required information
Barcodes and required product information need early space planning. They should not be treated as final additions after the design has been approved.
Give barcodes a clean, flat panel
A barcode should sit on a smooth, accessible area rather than over a fold, window, perforation, seam, textured finish or tight curve. Keep it away from busy artwork that reduces contrast.
For reliable scanning, confirm:
- The barcode type required by the retailer, marketplace or inventory system.
- The correct number or data encoded.
- The required quiet zones around the code.
- The minimum printed size and orientation.
- Whether the code will be scanned at a point of sale, in a warehouse or from an e-commerce fulfilment label.
- Whether verification or testing is required by the retailer or supply chain partner.
Do not resize, crop or recreate a barcode from a low-resolution screenshot. Use the approved source artwork and verify it after final sizing. QR codes need the same care: sufficient contrast, clear space and a final test from a printed proof where possible.
Plan legal, operational and product copy
The exact information required on packaging depends on the product category and how it is sold in South Africa. Food, cosmetics, chemicals, electrical goods, children’s products and imported products can have different labelling obligations.
Before artwork approval, the responsible product or compliance team should confirm the current requirements for the specific product. This may include, as applicable:
- Product name and description
- Net quantity and units
- Ingredient or material information
- Allergen, safety or handling statements
- Directions for use, storage or disposal
- Responsible supplier details
- Country-of-origin statements where required
- Batch, lot, date or traceability areas
- Relevant symbols or recycling guidance
Designers should allow enough editable space for this information. Avoid rasterising legal copy into an image, because late corrections are common and text needs to remain legible.
Run a preflight before approval
A preflight is a structured check of the final artwork before it is released for proofing or production. It should involve more than the designer: brand, product, procurement and compliance stakeholders may each own a different part of the sign-off.
Use the following checklist before approving a packaging file.
Structural and layout checks
- [ ] The artwork uses the latest approved dieline revision.
- [ ] The dieline has not been moved, redrawn, scaled or distorted.
- [ ] Cut, crease, perforation, glue, window and finishing lines are on separate technical layers.
- [ ] The front, back, sides, base and closure panels are correctly mapped.
- [ ] All text and graphics read in the intended direction after assembly.
- [ ] Artwork extends fully into the required bleed.
- [ ] Essential content remains within the safe area.
- [ ] No important elements sit across folds, seams, windows, notches or perforations.
- [ ] Borders close to trim edges have been avoided or deliberately approved.
Print and file checks
- [ ] Images are suitable for their final printed size.
- [ ] Fonts, links and placed graphics are correctly included or outlined as required.
- [ ] Colours match the agreed print specification.
- [ ] Spot colours, white ink and finishing masks are correctly named and separated.
- [ ] Overprint, knock-out and transparency settings have been reviewed.
- [ ] The exported PDF opens without missing elements or unexpected line changes.
- [ ] Technical dieline lines are set not to print, unless the production specification says otherwise.
Content and commercial checks
- [ ] Product name, SKU, variant, size and claims are correct.
- [ ] Required information has been checked by the appropriate owner.
- [ ] Barcode or QR code data is correct, clear and suitable for its intended scanner.
- [ ] Variable information fields, such as batch or date spaces, are allowed for.
- [ ] Retailer-specific artwork rules have been checked where relevant.
- [ ] The approved proof version is clearly named and archived.
Common approval mistakes
The most costly error is assuming a visual PDF is a production-ready file. Other frequent issues include approving an old dieline, omitting bleed on one panel, putting barcode quiet zones over artwork, and sending a foil mask as ordinary CMYK artwork.
Another common problem is approving copy without seeing it in context. A long ingredient list may technically fit but become unreadable once printed on a narrow side panel. Review text at realistic size, not just at 200% zoom.
Choosing the right level of packaging support
Not every project needs the same level of technical input. A straightforward one-colour label on an established format needs less structural review than a new retail carton with a window, foil and several mandatory copy blocks.
Consider a more detailed artwork and structural review when:
- You are launching a new box style or changing the product dimensions.
- The pack has multiple folds, an insert, a window or a complex closure.
- Several teams supply content, including marketing, regulatory and procurement.
- The design uses special finishes or non-standard materials.
- The product will be listed by a retailer with barcode or packaging specifications.
- The artwork is being adapted across several sizes or variants.
For standard printed packs, start by selecting a suitable custom packaging box format, then request the correct dieline before the final design stage. This avoids designing to assumed dimensions and helps artwork, procurement and production teams work from the same reference.
XGolden Print has 27 years of packaging and printing experience, which can be useful context when discussing a production-ready dieline and artwork handover. The essential point, however, is to confirm the requirements for your particular box format, materials, print method and finishes rather than relying on a generic template.
FAQ
Is a dieline the same as a box mock-up?
No. A dieline is the technical flat template used for manufacturing. A mock-up is a visual representation of how the finished packaging may look in three dimensions. Use the mock-up to assess appearance and the dieline to prepare production artwork.
Can I use one dieline for different box sizes?
Usually not. Even if two boxes appear similar, changing dimensions can alter folds, flaps, glue areas and proportions. Request a specific dieline for each size unless the packaging supplier confirms that the structure is unchanged.
Should dieline lines appear in the final PDF?
They should remain visible for file review but normally be set as non-printing technical information, according to the supplier’s instructions. Do not delete them simply because they should not appear on the finished pack.
How much bleed should packaging artwork have?
Follow the job-specific requirement. Around 3 mm is a common starting point for some printed packaging, but it is not a substitute for the specification supplied for your format and finishing process.
Can important text cross a crease?
It can, but it is generally best avoided. A crease can distort fine type, interrupt readability and create an uneven visual result. Keep product names, legal copy and small text inside one panel wherever possible.
A final artwork handover should include the approved production PDF, the source file if requested, linked assets where applicable, and a clear record of the approved version. Taking time to map panels, protect safe areas and run a structured preflight makes packaging dielines far easier to manage—and helps the finished pack match the design intent.
