
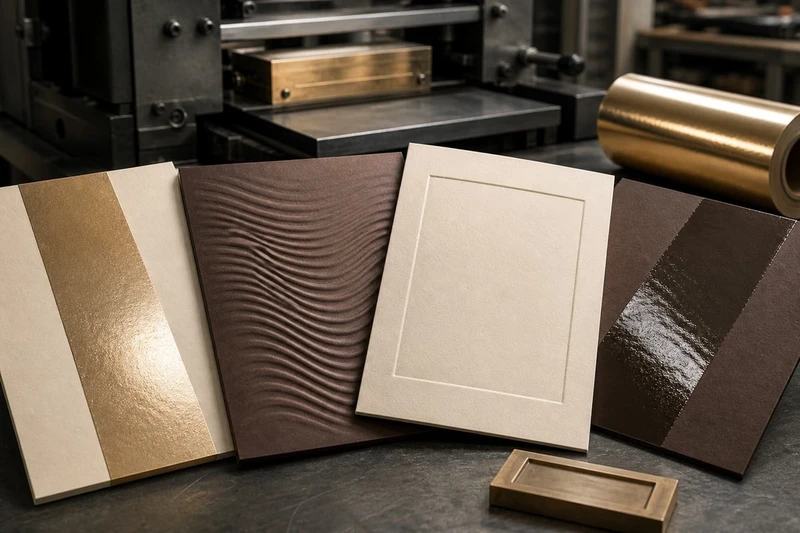
Choosing between foil, embossing, debossing and spot UV comes down to the impression your packaging needs to make: foil adds reflective colour, embossing raises selected details, debossing presses them in, and spot UV creates a glossy contrast on an otherwise matte or uncoated surface.
For most premium boxes, the strongest choice is not simply the most decorative finish. It is the finish that suits the artwork, board, coating and viewing conditions. This foil embossing spot UV comparison explains where each method works best, what can go wrong, and how to specify a finish that remains effective from the sample through to production.
| Finish | Main visual effect | Tactile result | Best suited to |
|---|---|---|---|
| Foil stamping | Metallic, pearlescent or coloured reflective detail | Usually smooth; may be raised if combined with embossing | Logos, borders, fine icons, premium brand accents |
| Embossing | Shadows and highlights created by a raised form | Noticeably raised | Logos, monograms, simple patterns and focal details |
| Debossing | Recessed detail with subtle depth | Pressed below the surface | Minimalist marks, luxury stationery-style packaging, tactile branding |
| Spot UV | Glossy contrast against a matte or uncoated background | Slightly raised in some applications, but primarily smooth | Patterns, product imagery, large logo areas and tonal details |
Compare the visual and tactile result
Each finish catches the eye differently. A good comparison starts with how the box will be seen and handled in real conditions: on a retail shelf, in an online unboxing video, or in a customer’s hands.
Foil stamping: reflective and high contrast
Foil stamping uses heat and pressure to transfer a thin foil layer to selected artwork. Gold and silver are familiar choices, but coloured, holographic and other speciality foils may also be available depending on the printer and specification.
Foil creates a crisp, premium highlight. It is especially effective on dark boards, deep-coloured printed backgrounds and restrained designs where the foil has room to stand out. A metallic logo or narrow border can lift a gift box without needing extensive graphics.
Its feel is normally relatively smooth, although the foil itself may have a subtle edge. When foil stamping is combined with embossing, the result becomes both reflective and raised. This is often called foil embossing, but it is important to specify whether foil and embossing must align in the same area or whether they are separate features.
Choose foil when:
- Your brand mark needs immediate shelf visibility.
- A small amount of detail must signal premium value.
- The design has enough contrast behind the foil.
- You want a strong decorative effect without covering a large part of the pack.
Watch for: very fine reversed-out elements, small type, or large solid foil blocks. These can lose definition, reveal imperfections or make the design look overly reflective.
Embossing: dimensional and tactile
Embossing presses paperboard upwards using matched tooling. The raised shape creates natural highlights and shadows even when the design uses no metallic ink or foil. It is often more understated than foil, yet more engaging to touch.
An embossed emblem, crest or wordmark works well where customers handle the packaging closely, such as presentation boxes, cosmetics, fragrance cartons or premium promotional packs. A blind embossing uses no printed or foiled colour, relying only on the sculpted surface.
Choose embossing when:
- Touch is central to the unboxing experience.
- The logo or motif is simple enough to retain a clean shape.
- You want a subtle premium effect on textured or uncoated stock.
- The design should remain elegant under varied lighting.
Watch for: dense artwork, tiny internal cut-outs and close-spaced lines. These can flatten or fill in when pressure is applied. Embossing also affects the reverse side of the sheet, so the inside print and construction need consideration.
Debossing: recessed and restrained
Debossing creates an indented image rather than a raised one. It can look refined and architectural, especially on heavier uncoated boards, textured papers and minimal packaging designs. The effect is less visible from a distance than foil or spot UV, but it has a deliberate, high-touch character.
Because the detail sits below the paper surface, shadows can make it more apparent from certain viewing angles. This suits brands aiming for a quieter or more crafted presentation rather than a highly reflective finish.
Choose debossing when:
- The packaging needs a subtle tactile signature.
- The artwork is bold, simple and not dependent on tiny details.
- You are working with a suitably substantial paper or board.
- A recessed logo supports the brand’s visual direction.
Watch for: thin or low-caliper stocks, detailed illustrations and broad shallow recesses. The result can be faint, uneven or visible on the reverse side in ways that interfere with other artwork.
Spot UV: gloss that reveals itself in the light
Spot UV is a clear, high-gloss coating applied only to designated areas. It is most often used over a matte laminated surface, where the contrast between flat matt and gloss is immediately visible. It can make a logo, pattern, image detail or product name appear when light moves across the pack.
Unlike foil, spot UV does not add metallic colour. Unlike embossing and debossing, it delivers most of its impact visually rather than through deep texture. Some spot UV applications have a slight build, but it should not be specified as a substitute for an embossed effect.
Choose spot UV when:
- You want tonal detail without introducing another colour.
- A pattern, image or larger graphic area needs subtle shine.
- The pack has a matt laminated surface.
- The design benefits from a contemporary, clean finish.
Watch for: fingerprint visibility, scuffing on high-contact areas and very fine lines. Large spot UV fields can also look patchy or show surface variation, particularly on darker colours.
Match each finish to suitable artwork
A finishing method cannot rescue artwork that is too detailed, too small or visually overloaded. Plan the decorative layer early, rather than adding it after a full-colour design is complete.
Artwork that suits foil
Foil works best with clean vector shapes, medium-to-bold type, uncomplicated logos and linework with sufficient spacing. It is ideal for a single prominent wordmark, a frame, a seal or a few selected graphic elements.
Avoid making foil do too much. A large gold-foiled illustration with tiny details may look less premium than a simple foiled logo on a well-designed background. Small text should be checked with the printer before approval, as minimum line widths and type sizes vary with foil, substrate and artwork.
Artwork that suits embossing or debossing
Embossing and debossing favour simple, open forms. Thick lettering, geometric marks, monograms and line patterns with generous space between elements hold their shape better than intricate illustrations.
Use one clear level of relief unless a specialist multi-level effect has been expressly planned and quoted. A complex raised image can be impressive, but it introduces greater tooling, registration and production complexity.
For blind embossing or debossing, ensure the detail remains recognisable without relying on ink colour. If the design only works because of a printed outline, it may not read well as a purely dimensional finish.
Artwork that suits spot UV
Spot UV can follow the contours of text, logos, illustrations and patterns. It works particularly well when it selectively highlights details already present in the print design: a product silhouette, botanical pattern, abstract texture or a brand symbol.
Use it with purpose. Covering every graphic element in gloss reduces the contrast that makes spot UV effective. On a matt pack, one focused spot UV element is often more noticeable than a fully gloss-covered panel.
Prepare separate finish layers
For reliable quoting and production, provide a separate vector layer for each special finish. Label it clearly, such as:
FOIL_GOLDEMBOSSDEBOSSSPOT_UV
Set each finishing layer as a solid spot colour and keep it separate from CMYK artwork. The production team needs to know whether a finish sits exactly over printed artwork, knocks out the print beneath it, or applies independently.
Review paper and lamination interaction
The same finish can look very different on different materials. Do not choose a finish in isolation from the carton board, cover paper, laminate or print background.
Uncoated and textured papers
Uncoated papers can give embossing and debossing a tactile, natural appearance. Their surface texture may soften very fine foil detail or reduce the crispness of very thin spot UV lines. A slightly bolder design generally performs better.
Textured cover papers can be especially appealing for blind embossing, but the grain and surface variation become part of the result. Ask to see the actual paper before committing to a fine logo or precise line pattern.
Smooth coated boards
Smooth coated boards allow fine printing and can support crisp foil details. They may be suitable for embossing, provided the board has adequate strength and the design is not overly detailed.
A glossy printed surface can compete with foil or spot UV. If your objective is visual contrast, a matt finish often provides a more controlled base.
Matt lamination
Matt lamination is a common foundation for spot UV because it creates a clear dull-versus-gloss contrast. It can also provide a polished background for foil stamping.
However, matt laminated packs can show scratches, rub marks or fingerprints depending on colour, handling and the laminate selected. Discuss the expected handling conditions for retail packs, presentation boxes or e-commerce packaging before finalising the surface.
Soft-touch lamination
Soft-touch lamination offers a velvety feel and can make foil and spot UV appear particularly striking. It is often selected for premium gift packaging, but it should be tested because the coating can influence adhesion, scuff resistance and the perceived sharpness of fine finishing details.
Dark printed backgrounds
Black, navy, charcoal and other deep colours can make gold, silver and coloured foils stand out. They also reveal scratches, dust and uneven gloss more readily. A full-size sample is particularly important where a dark background meets a large spot UV area or extensive foil coverage.
Understand tooling, registration and coverage
These finishes depend on physical processes, not just digital artwork. Their results are affected by tooling, pressure, heat, substrate variation and alignment tolerances.
Tooling affects cost and detail
Foil stamping, embossing and debossing usually require purpose-made tooling. This makes them better suited to designs that will be repeated across a meaningful production run, rather than constantly changing artwork.
Tooling is not a reason to avoid a finish; it is a reason to finalise the artwork before production. Late logo changes, altered dimensions or revised linework may require revised tooling and a new approval.
Spot UV may also require its own screen or plate, depending on the process. Confirm the setup requirements and whether artwork changes affect these costs.
Registration is not infinitely precise
Registration means alignment between the finish layer and the printed artwork. A foiled outline around tiny printed text, for example, needs very close alignment. Normal production movement can make minor shifts visible, particularly where the finish is designed as a narrow border around another colour.
To make artwork more tolerant:
- Avoid extremely thin foil or spot UV keylines around printed elements.
- Build a little visual allowance into overprinted effects.
- Use bold shapes rather than delicate, tightly registered outlines.
- Keep critical finishes away from folds, scores, edges and die-cut windows.
- Avoid relying on perfect alignment between several intricate processes.
Where an embossed or debossed feature must align with a printed image, inspect a physical sample rather than judging a flat digital proof.
Coverage changes the risk profile
Small foil accents are usually easier to control visually than broad, solid foil areas. Large foil coverage may show joins, surface variation or pressure differences. Similarly, broad spot UV blocks can expose uneven sheen, dust attraction or handling marks.
If the desired effect involves extensive coverage, ask whether a metallic paper, metallic ink, printed pattern or an alternative construction would better achieve the look. The right answer depends on the design and substrate, not simply on which option seems more decorative.
Combine finishes without visual clutter
Combining finishes can create a memorable pack, but each added effect needs a clear job. The best combinations use contrast: a matt background with spot UV, a restrained foil logo with blind embossing, or a foiled mark raised by embossing.
Effective combinations
Foil plus embossing A classic choice for a prominent logo, monogram or emblem. The foil catches light while the embossing adds depth. Keep the shape bold enough for both effects to remain clean.
Matt lamination plus spot UV Suitable for patterned cartons, beauty packaging and product boxes where a graphic reveal is desired. Use spot UV selectively so the matt-versus-gloss contrast remains visible.
Blind embossing plus foil accents Use blind embossing for a large background pattern and foil for a small focal element. This creates hierarchy without making every detail compete.
Debossing plus minimal print A recessed logo on a well-chosen cover paper can carry a minimalist pack. Add printed information only where needed for clarity and product communication.
Common combination mistakes
- Applying foil, embossing and spot UV to the same crowded logo.
- Using several metallic foil colours without a hierarchy.
- Adding spot UV over every printed image and text element.
- Placing dimensional effects across fold lines or close to glued seams.
- Making important legal, product or variant information dependent on a decorative finish.
- Selecting a finish before deciding on the board, laminate and box structure.
For custom boxes, it is useful to map the finishing effect across each panel. A treatment that works on the lid may be unnecessary on side panels, while an embossed feature near a fold may not show as intended after assembly.
Approve samples on the chosen substrate
A screen proof cannot accurately show metallic reflection, pressure depth, paper texture, gloss contrast or the reverse-side effect of embossing. Approve special finishes on the actual—or as close as practical to the actual—substrate, laminate and print colour.
Your sample review should cover more than whether the logo is centred. Check the pack under direct light, retail-style lighting and normal indoor light. Handle it as a customer would.
Use this approval checklist:
- Is foil coverage even, with sharp edges and no unwanted gaps?
- Is the embossed or debossed form clear without crushing nearby print?
- Does spot UV create enough contrast against the chosen surface?
- Are fine lines, small type and counters in letters still legible?
- Does the finish align acceptably with the printed artwork?
- Are there visible marks, scratches, cracking or unwanted surface changes?
- Does the effect work across folds, corners, edges and box assembly points?
- Is the reverse side of an embossed or debossed panel acceptable?
- Does the final effect suit the intended product position and customer experience?
For presentation packs and gift packaging, also assess how the finish performs after opening, closing and handling the box several times. A decorative panel may look excellent flat but behave differently once it is wrapped around a rigid structure or folded carton.
How to select the right finish for your packaging
Use the following practical shortcut when comparing options:
- Choose foil for high-visibility metallic detail and a clear premium accent.
- Choose embossing for a raised, tactile focal point that remains elegant without shine.
- Choose debossing for a recessed, understated effect on simpler, more tactile designs.
- Choose spot UV for glossy contrast, tonal patterns and detail over a matt surface.
- Choose foil embossing when the main logo or emblem needs both light-catching impact and physical depth.
- Use more than one finish only when each adds a distinct visual or tactile purpose.
Your final choice should also reflect the production quantity, artwork complexity, panel size, substrate and how frequently the box will be handled. A finish that is technically possible may not be the most suitable option for the design or budget.
Frequently asked questions
Is foil embossing the same as foil stamping?
Not always. Foil stamping applies foil to the surface, while embossing raises an area of the board. Foil embossing generally means the foiled area is also embossed, but the exact process should be confirmed in the production specification.
Can spot UV be used on unlaminated board?
It can be possible, but the result depends heavily on the board’s absorbency and surface texture. Spot UV is commonly most visually distinct over matt lamination. Request a sample if gloss contrast is important.
Does embossing work on all box materials?
No. Embossing and debossing depend on the board’s thickness, fibre structure, coating and construction. Fine details may not hold on thinner or highly coated material, and the reverse-side impression must be considered.
Which finish is best for a small logo?
Foil is often the most visible choice for a small logo, provided the artwork is not too fine. A small embossed logo can also work if it has bold shapes and enough surrounding space. Spot UV may be subtle on small marks unless the base surface is matt.
The most reliable next step is to choose one focal area, prepare separate finishing layers in the artwork, and request a physical sample on the intended board and laminate. XGolden Print can then help translate the approved design into a clear production specification for your packaging.
