
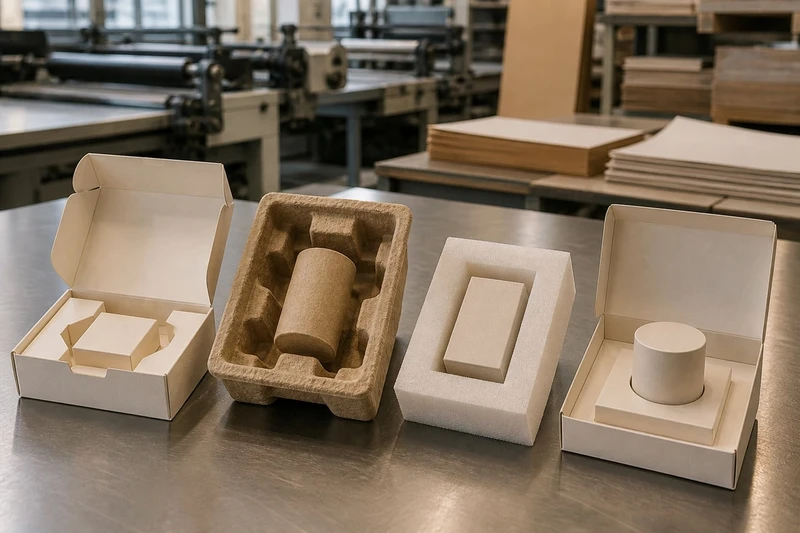
The right custom box insert holds the product securely, protects its vulnerable points and supports the unboxing experience without making packing unnecessarily slow or wasteful. Start with the product—not the insert material. Its weight, shape, finish, fragile components and delivery journey should determine the design.
For most projects, paperboard inserts suit light-to-medium products and branded retail presentation; moulded pulp suits products needing shaped cushioning with a fibre-based look; foam suits delicate or heavy items needing higher shock absorption; and platform inserts work well when the product needs to be raised, framed or displayed. A sample fit test is essential before production.
Start with product weight and fragile areas
A custom box insert selection should begin with a product assessment. Two products of the same outer dimensions can require completely different support. A glass bottle and a folded garment may fit the same box, but their risks during handling are not comparable.
Record the following before requesting an insert design:
- Finished product dimensions: Measure length, width and height at the widest points, including lids, handles, cables and protrusions.
- Product weight: Weight affects the insert’s strength, the depth of support needed and the likelihood of movement in transit.
- Fragile areas: Identify corners, screens, necks, pumps, caps, glass edges, coated surfaces and any part that could bend, crack or scratch.
- Centre of gravity: A product that is top-heavy or unevenly weighted can tip or rotate unless the insert supports it in the right place.
- Surface sensitivity: Matte coatings, polished metal, varnished wood and soft-touch finishes may scuff when they rub against an abrasive insert.
- Packed configuration: Consider accessories, instruction leaflets, chargers, samples, refill packs and other components that must travel in the same box.
- Likely handling conditions: Assess whether the box may be stacked, carried by hand, moved between warehouses or transported over longer distances.
A useful rule is to support the strongest parts of the product while leaving clearance around fragile features. For example, a bottle insert should generally grip the body or shoulder rather than put pressure on the neck. An electronics insert should avoid pressing directly on a screen, button or connector.
Do not use tightness alone as a measure of protection. An overly tight insert may cause damage when a customer removes the item, while a loose insert lets the product build momentum and strike the box walls.
Match the insert to the level of risk
Think in terms of protection levels:
- Low risk: Lightweight, flexible or non-fragile products such as apparel, stationery or textile accessories. A folded paperboard divider, tray or platform may be sufficient.
- Moderate risk: Products that can scratch, dent, leak or shift, including cosmetics, candles, jars and boxed accessories. A close-fitting paperboard or moulded pulp insert may be appropriate.
- High risk: Heavy, breakable or precision-made items such as glassware, electronics, instruments or multi-piece kits. Consider engineered foam, moulded pulp with suitable geometry, or a multi-layer insert system.
The outer packaging still matters. An insert cannot compensate for a box that is too large, too weak for its contents or poorly matched to the transport conditions. Plan the insert and carton together when developing custom boxes.
Compare paperboard, moulded pulp, foam and platform inserts
There is no universally best insert. Each type makes different trade-offs between protection, appearance, packing speed, material use and end-of-life options.
| Insert approach | Best suited to | Protection and retention | Presentation | Assembly considerations | End-of-life considerations |
|---|---|---|---|---|---|
| Paperboard insert | Light-to-medium products, cosmetics, retail kits, gifts | Good when designed with folds, tabs and accurate cut-outs; less cushioning for hard impacts | Highly printable and easy to colour-match with the box | May ship flat and be folded during packing; complexity affects labour | Often easier to separate and recycle where local paper streams accept the material; coatings and laminates may alter this |
| Moulded pulp insert | Bottles, jars, personal care, household products and protective trays | Good distributed support and surface separation; geometry is important | Natural, tactile appearance; limited fine graphic detail compared with printed board | Usually supplied formed; can be quick to place if the product shape is consistent | Fibre-based option, but confirm composition and local disposal guidance, especially if contaminated or combined with other materials |
| Foam insert | Delicate, heavy or high-value products, electronics and tools | Strong cushioning and secure retention when correctly specified | Can look clean and premium, particularly with precise cavities; printing is usually limited | Commonly easy to load into a box, although multi-part designs can add steps | Disposal routes vary significantly by foam type and local facilities; do not assume kerbside recyclability |
| Platform or riser insert | Premium gifts, jewellery, cosmetics, apparel and product launches | Primarily positions and elevates; may need secondary retention for transport | Strong display effect; creates a reveal when the box opens | Can be simple or layered; check that the raised product does not contact the lid | Depends on the materials used; mono-material paperboard platforms are generally simpler to separate than mixed constructions |
Paperboard inserts
Paperboard is often a practical choice for retail and gift packaging because it can combine structure with branding. A die-cut insert can include product cavities, dividers, sleeves, folded sidewalls and printed panels in one system.
Choose paperboard when:
- The product is relatively light.
- Brand colour, print detail or a refined internal finish matters.
- You want the insert and box to feel visually coordinated.
- Flat-packed components could help reduce storage volume before assembly.
- You need compartments for several small items.
Its main limitation is impact cushioning. A paperboard insert can prevent rattling and keep products separated, but it does not absorb shocks in the same way as foam. It can also lose rigidity in damp conditions or when supporting a product that is too heavy for the chosen board construction.
Moulded pulp inserts
Moulded pulp is shaped fibre material that forms a protective cradle around a product. It is particularly useful where the product has a repeatable shape and benefits from a tray-like support, such as a jar, bottle or device.
Choose moulded pulp when:
- The product needs cushioning across a broader surface area.
- A natural, uncoated packaging appearance suits the brand.
- You want to limit loose-fill material.
- Product placement needs to be quick and consistent.
Moulded pulp can have a more textured finish than paperboard and may not be suitable for every luxury aesthetic. It can also generate fine fibre dust in some circumstances, so test it with dark, glossy or highly sensitive product surfaces. If the item must look pristine at first opening, consider whether a tissue wrap, sleeve or surface barrier is required.
Foam inserts
Foam provides reliable cushioning for products that are heavy, fragile or vulnerable to repeated vibration. It may be die-cut, layered or shaped with cavities to locate the product accurately.
Choose foam when:
- Damage from drops, vibration or product-to-product contact is a major concern.
- The product is heavy relative to its size.
- Components need individual cavities.
- The product has irregular geometry that must be closely supported.
Foam selection needs care. Density, thickness, material type and cavity design influence performance. A foam insert that feels firm is not automatically appropriate for every product; excessive pressure can mark finishes, strain delicate assemblies or make removal difficult. It is also important to decide how the recipient will dispose of it, especially if your brand has a material-reduction goal.
Platform and riser inserts
A platform insert raises the product above the base of the box. It can create visual depth, reveal a message underneath or make a small item appear more substantial. Platforms are common in premium gifting, cosmetics and presentation-led product launches.
Choose a platform insert when:
- The unboxing sequence matters as much as basic containment.
- The product should sit at a particular height in the box.
- A message card, accessories or tissue need to be presented below or around the item.
- The product is already protected by its own primary packaging.
A platform is not necessarily a transport insert. If the product can slide off, tip over or touch the lid, add retention features such as a collar, folded tabs, a sleeve, a ribbon pull or a separate cavity.
Plan fit, retention and finger access
An insert should make the product easy to place, secure in transit and simple for the recipient to remove. Those requirements can conflict, which is why accurate dimensions and prototypes matter.
Build in sensible tolerances
The product cavity cannot be designed from nominal dimensions alone. Products vary slightly between production batches, labels can add thickness, and folded packaging may not sit exactly the same way every time.
Confirm:
- Actual minimum and maximum product dimensions.
- Variations caused by labels, shrink sleeves, caps or assembly.
- Whether the product is rigid, compressible or flexible.
- Whether temperature or humidity could affect the product or insert material.
- The thickness of any wrap, pouch, tissue or protective film.
A cavity with no allowance can make packing difficult and lead to bowed inserts. Too much allowance creates movement. The appropriate tolerance depends on the product, the insert material and the retention method, so it should be verified with physical samples rather than assumed.
Use retention features deliberately
Common retention methods include:
- Die-cut cavities: The product sits in a shaped opening.
- Friction tabs: Small tabs create light holding pressure.
- Collars and sleeves: These wrap around part of the product.
- Partitions: These keep multiple products apart.
- Top pads: A separate layer limits upward movement.
- Locking folds: Folded structures hold an item without extra adhesives.
- Paper bands or ribbon: Useful mainly for presentation, unless designed as a tested restraint.
For fragile products, control movement in all directions: side-to-side, front-to-back and vertically. A product that cannot move sideways may still jump upwards and strike the lid.
Do not overlook finger access
A tightly held product needs a way out. Finger notches, thumb cut-outs, pull tabs, ribbon lifts and removable trays all improve usability. Without them, customers may turn the box upside down, tug at sensitive areas or damage the insert while trying to remove the product.
Finger access should be positioned away from weak or fragile parts. For example, a notch beside a glass jar body may be useful; one placed at the cap could encourage customers to lift the item by the wrong component.
Consider presentation and assembly
The insert is part of the product experience. It can either make opening feel orderly and intentional or make the box seem crowded, awkward and wasteful.
For presentation-led packs, decide what the customer sees first:
- The product itself.
- A branded card or welcome message.
- Tissue paper or a protective wrap.
- A tray containing several coordinated items.
- A raised item with a hidden compartment beneath.
A clean interior often relies on restraint. Adding layers, ribbons, cards and compartments can create interest, but every extra piece increases material use, assembly time and the chance of inconsistent packing.
Design for the people packing the box
An insert that looks excellent in a mock-up may be slow or error-prone on a packing line. Review the assembly sequence before approval:
- Is the insert supplied flat, pre-folded or fully formed?
- How many folds, tabs or separate pieces are required?
- Can the product only be loaded in the correct orientation?
- Is adhesive needed, and where?
- Does the packer need to handle fragile components more than once?
- Can accessories be missed or placed in the wrong compartment?
- Does the completed box close without crushing the insert or product?
Where order volumes are substantial, even one additional assembly action can materially affect packing operations. Simplifying the insert can be more valuable than adding a decorative feature that customers may not notice.
For gifting projects, align the insert with the overall opening experience. A custom gift packaging solution may combine an insert, branded inner surfaces and carefully planned compartments, but the product must still remain secure when the box is handled.
Review material compatibility and disposal questions
Material choice involves more than appearance. The insert must be compatible with the product, packaging format and the disposal information you intend to communicate.
Check product-to-insert compatibility
Ask whether the insert could:
- Scratch or abrade a glossy, coated or metallic surface.
- Transfer dust, fibres, ink or odour.
- React poorly with oils, fragrances, moisture or food-contact packaging.
- Catch on labels, pumps, cables or small fittings.
- Leave pressure marks after being packed for an extended period.
- Stain if the product leaks.
Where a product has a sensitive surface, test the exact combination of product, protective wrap and insert. A simple barrier—such as tissue, a pouch or a sleeve—may solve a surface issue, but it adds another material and assembly step.
Keep disposal communication accurate
Paperboard, pulp and foam should not be described with broad environmental claims without reviewing the exact materials, coatings, adhesives and local collection options. A fibre-based insert may be easier to separate than a multi-material insert, but recyclability in practice depends on what facilities accept and whether the material is clean and dry.
Useful questions to ask during custom box insert selection include:
- Can the insert be separated from the outer box without tools?
- Is it made from one material or several bonded materials?
- Does it contain laminates, plastic films, magnets, foam pads or metal components?
- Will the product likely contaminate it with oil, wax, food or cosmetic residue?
- Can disposal instructions be stated clearly and honestly for the intended market?
- Could the design use less material while maintaining protection?
Mono-material designs can simplify separation, but should not compromise product protection. Preventing product damage is also an important part of reducing avoidable waste.
Approve the insert through fit testing
Never approve an insert only from a digital drawing or a visual render. Fit testing is where dimensions, material behaviour, product variation and real packing conditions become clear.
Use production-representative product samples where possible. If the product is still being finalised, identify the range of possible dimensions and repeat testing when final samples are available.
A practical fit-test checklist
Check the insert with the outer box closed and packed as intended.
- The product enters without forcing, bending or scraping.
- It does not rattle when the closed pack is gently moved.
- It cannot contact the box walls, lid or another product during normal handling.
- Fragile areas are not carrying unnecessary pressure.
- The item can be removed without turning the box upside down or damaging it.
- Labels, logos and front-facing details are correctly oriented on opening.
- Accessories fit their compartments and do not migrate.
- The insert does not buckle, collapse or lift out unintentionally.
- The box closes cleanly without excessive pressure.
- The packing sequence is clear enough to be repeated consistently.
Where the product will be distributed through multiple handling stages, evaluate the packed sample under conditions that reflect the likely journey. This may include stacking, repeated handling and controlled drop or vibration testing appropriate to the product and supply chain. The test method and acceptance criteria should be agreed by the people responsible for product quality, packaging and procurement.
Common selection mistakes to avoid
The most frequent problems are avoidable:
- Choosing an insert material before measuring the product properly.
- Designing around an early prototype rather than the final item.
- Leaving no allowance for labels, wraps or manufacturing variation.
- Focusing on a premium appearance but not testing retention.
- Making the cavity too tight for easy removal.
- Assuming fibre-based materials are automatically suitable for every product surface.
- Using foam without considering separation and disposal communication.
- Adding multiple layers that slow packing without improving protection.
- Approving artwork before the physical insert and product have been checked together.
Final selection checklist
Before placing an order, make sure the specification answers these questions:
- What parts of the product need support and what parts need clearance?
- What movement is acceptable inside the closed box?
- Which insert approach gives adequate protection without unnecessary bulk?
- Does the insert support the intended retail or gifting presentation?
- Can the pack be assembled consistently at the required volume?
- Are the product, insert and outer box compatible?
- Can the customer remove the product comfortably?
- Are material and disposal statements accurate for the final construction?
- Has the final product been physically tested in the final box and insert?
A well-chosen insert is a balance of protection, usability, presentation and practical packing. Start with product risk, compare materials against the real delivery and display needs, then approve the final design only after a physical fit test. For a project-specific specification, prepare your product dimensions, component list, finish requirements and packing sequence before discussing a custom insert with XGolden Print.
